LESSON 3
Design Process & Philosophy
After I gave up my life as a career scientist, and put the sailing on pause for a while, I went back to university to study design. It was so enlightening to me that creativity was, in fact, a process, and not a skill we are born with. If you are able to slow down, and logically think through a problem, idea or creation using what we call ‘design process’, you are able to use your own experiences in life, plus your unique brain and what is important to you to create ideas and concepts that are truly special.
I know most of you reading this will instantly feel that twinge of self-doubt, but put that aside for now. We are going to take baby steps to learn about how this works — and once you’ve learnt it, it’s going to be simple, and fun to apply it throughout your projects and lives.
This chapter is about innovation. You’ve found who you are, what that looks like to you – now it’s time to experiment with the form of that in the real world.

Lesson: Design Process
Over the past two chapters we’ve understood concepts around authenticity, beauty and storytelling – and understood how the three can work together for you to create successfully and congruently around you. Now we finally get our hands dirty and start the process of planning, designing and creating.
Whatever project you’re working on, or if you are using a fictitious project just for practice, now is the time to start the actual design of it, in which you will embed your values from Chapter One, and start to wind in your story from Chapter 2.

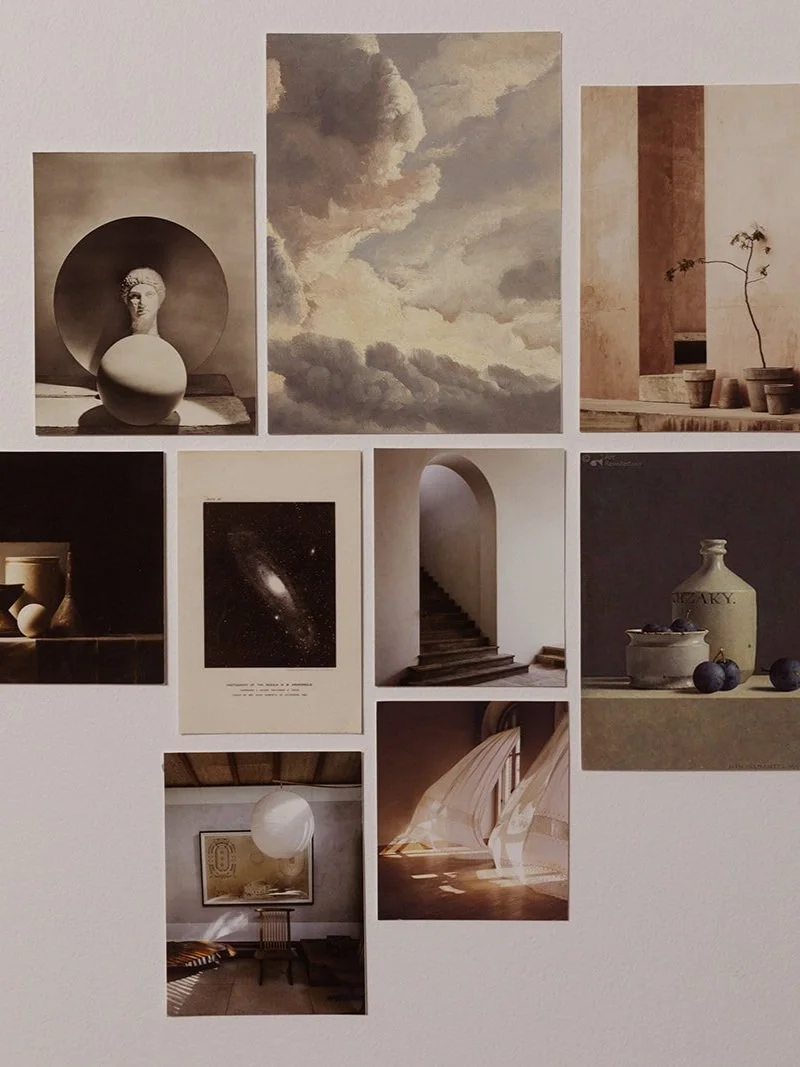
Mood boarding is often more about explaining emotion, colour and form in pictures rather than spaces to copy.
Step One: Mood boarding
Create a mood board so you can see your values & story in pictures – this is a critical step in the translation of theory to practice. It doesn’t really matter what the platform is – you can use Pinterest, a Word document or a folder of magazine pictures at your desk – it’s simply an exercise to critically think about what words mean to you in images. Creating a mood board will help you stay true to you and your personal aesthetic, not to design trends. If you reference back to your case study document, you’ll see mine. Notice the links between my values, my story – and then, how that looks and feels for me.
It’s really important for you to understand that there are no right or wrong answers or interpretations here for your own work, this class is about teasing out what’s in YOU – and if you trust me enough to take it through this class, and your projects – just how special and powerful that can be.
A useful tip: when working, try to find an image (or images) for each aspect of your distilled story. Know that they won’t all be pictures of interiors or objects, and shouldn’t be. For those of you wondering how many to look for, I encourage you to select at least 20 images. This really makes sure you have explored the non-obvious parts of your inward thinking.
Workbook Time. Reach for your workbook, and complete Exercise 3.1, now. Next complete Exercise 3.2. Take a look at your mood board, what do you discover looking at it all together? Journal thoughts, feelings, emotions, connections. Sometimes taking a look at what you’ve created as a whole triggers thoughts on your projects you have yet to connect to. It’s also okay if this dosn’t happen for you. Trust the process, and your intuition.
Step Two: Ideas & Planning
Now it’s time to brainstorm your project. The first thing we are going to do is pull back out the work you did with your story, and start to attach visual or styling ideas to each part of it. The plan here is to start to develop visual ideas you may not have yet considered.
Once you have completed that exercise, it’s time to plan. Drawing on your values, story and mood board – thinking inwards to design outwards, exploring possible solutions. Whatever you are here to work on, be it a single room in your house, a whole house or a product – now is finally the time for your ideas, sketches, layout and/or concepts.
I once read a beautiful book by an interior design teacher, long out of print, in which she strictly instructed students to try a room layout at least 3 or 4 different ways, even if the student was certain they knew what they wanted to do or the right way things should be placed. She always pointed out that by the 3rd or 4th iteration of a plan or idea, once the student had bucked the expected ideas, true magic and genius tend to shine through. I’d love for you all to remember this as well, and take it on as something you do too. My wish for you all is to be magical and genius!
Pushing your brain to try more and more ideas should be a part of your creative process across all areas of this class and your work after you leave here, in fact – this is why we gave you 4 spaces to try on story and styling ideas in your workbook for chapter 2. Go back during this class, see if you can find new stories – and then, in chapter 4, the next chapter – new ways to style them, or bring them to life in your work.
It doesn’t have to be fancy, but roughly draw out your room, or sketches of something you hope to make. In my case study, let’s pretend I’ve done some napkin sketches for a room layout, and some rough sketches for my ceramics line, no option unturned — whether it could be a reality or not! Let’s hope you can see how this exercise could be interpreted depending on the project you are taking through this class. This could be quite a short exercise for some of you, and for those working on large spaces and houses, it may take weeks — that is okay!
Workbook Time. Reach for your workbook, and complete Exercise 3.3 and 3.4, now. This exercise is a long one – it’s essentially your planning for your project now we’ve done so much work exploring what’s inside you. It’s okay to close down this school for a few days or a week while you concentrate solely on this exercise. I’d encourage you to make your ideas rough and plentiful no matter how outlandish they may be, to take through to the next step, your prototype.
Step Three: Prototype
You should all have at least 2 or 3 rough ideas for your project from the last step, and now is the time to see if they have any viability. Whatever you’re planning, here are some ways you can do that ...
Spaces: I find two simple ways can work well here.
Firstly, if you are physically in the space you are trying to design, large blankets or sheets folded to the size of the objects you are considering placing in that space really do give the best sense of how it might work, what problems could arise, how your space might feel and what might be missing.
Secondly, if you’d like to be a bit more accurate, use a good old gridded bit of paper, with each square equating to a measurement in the real world (clearly I am option one, I like to feel out a space!)
Objects: A physical prototype. My parents are swag makers, they always have been! They have always made prototypes out of cheap vinyl or thick calico so they could mark them up or draw notations all over them. Consider modelling Plasticine, paper cut-outs or clay.
Workbook Time. Reach for your workbook, and complete Exercise 3.5, now. It’s about physically exploring some of the ideas you’ve come up with to see what works, what you are drawn towards – what’s exciting you. This will look different for all of you, so please submit a question in the FAQ section at the end of this chapter if you feel stuck, always happy to guide you.
Step Four: Test
The final step is to test your ideas from step three. Now is a good time to get your friends and family involved for their opinion.
Testing is essential because everything, ultimately, should be about the people who will use your space or ideas. You want to see what those who will be involved think about your ideas – you’ll find after this step, you’ll feel clear about the design or designs you’ll want to take forward. Please know that you don’t necessarily have to take on board every suggestion offered by your friends and family (because everyone will have their own opinions), but it’s a really good way to help you clarify your ideas.
For those who don’t feel clear, just pop a pin in your work, and let time do its magic. We find students sometimes need a few weeks to marinate on things before that ah-ha moment pops up!
Workbook Time. Reach for your workbook, and complete Exercise 3.6, now. It’s time to test. It’s also time to write down the 4 stages of your new design process for all future work in Question 3.1.
The next part of this class moves into Styling, or visually how to piece projects together. It is important that you stay here — and work up a few concepts to take through to the next stage, be it your room plans and visual concepts if you are working on your spaces, or prototypes of a product or idea if you are here working for your business.
03. Homework
Read: Inversion, and how we can use it to create great art.
Read & Watch: How to brainstorm.
03. Community
Any work, or ideas you are posting related to this class, please use the hashtags #principlesofstyle and #poss03 so your fellow classmates can connect with you and continue to grow this community.